Pages

Friday, October 30, 2015

Switching from Windows to Mac OS X - How To's

Few months back i shifted from Windows to Mac OS and I wished there should be somewhere where i can find all the things to get started.
Recently there was a post on microsoft's website to switch from macbook to surfacebook.
This is my small attempt to do the reverse (Jade this is for you)

What do i see on mac desktop?

Good apple support page - Mac Basics

What are different keyboard keys

Command - It is almost equivalent of Ctrl key from Windows.
    Example - Command + R to refresh, Command + F to find, etc.
Option - Think of this as Alt key in windows - It gives different options
Control - This is the tricky part, some of the command line / terminal options are used with Control key.
Helpful keyboard shortcuts

How do i right click - Two finger tap / click on trackpad

For more options - System Prefrences > Trackpad

End, Home, Move single word keys?

For user who are hard core users of windows they use End, Home keys to move around while editing a document. Initially it was difficult to remember, after few tries its better than moving your fingers all they way till edge of the keyboard.
Home - Command + Left Arrow
End - Command + Right Arrow
Move left one word - Option + Left Arrow
Move right one word - Option + Right Arrow


How do i search - Spotlight

This is one of the feature which windows never came close to.
Everytime I wanted to search for a software or a file, i used to click on Windows key and start typing. Windows search was SO SLOW that it was faster for me to find the software from program files itself.
Many times i type in 4 characters, it will show me correct software and as soon as i move my mouse and click on it, there are some other search results which i never wanted and opens up something else. - Most irritating was it opens up browser and gives search results.
On Mac, you can just click on Command + Spacebar - it opens up this search bar where you can search for softwares, files, etc.
Type anything and the search is so quick that you never open invalid software
TL;DR - Use Command + Spacebar

Where is control panel - System Preferences

Command + Spacebar > System Preferences or Apple Menu > System Preferences

Where is start menu - Top left corner application bar
This is mainly to be used for System Preferences, sleep, restart, etc.

Where are all my files? - Finder

Windows users have Explorer as there way to see all the files, for Mac its finder.

How to delete a file - Command + Delete

Yes only delete button wont delete the file, you have to use Command + Delete

How do i permanently delete a file - No simple way :(

1st step - Command + Delete
2nd step - Right click - Empty Trash or Command + Right Click - Secure Empty Trash
Complicated way - open terminal and `cd /path/to/file/or/folder && rm -r`

How do i open file from keyboard - Enter key renames the file :(

Use Command + Down Arrow

I want F5 (Refresh) on desktop

For all the windows users, its the most satisfying thing ever. If there is some issue / waiting for a task to complete, we always come to desktop and click F5 or Right Click > Refresh.
Mac does not have that. I miss that too :( One important thing is sometimes the files you have created / downloaded does not show up in Finder. For these things you will have to do a little trick. Option + Right Click on Finder icon in dock and click on Relaunch.

Program Files - Application Folder

All the softwares are available in Application folder

WHY GOD WHY - How to cut files on mac

I have no idea why they dont have way to cut button. Command + X does not work in finder.
Solution -
1st step - Source file / folder -> Command + C
2nd step - destination folder -> Command + Option + V

After closing my software - X button on top left (Command + W) - I can still see Application Menu items

This is one of the most confusing thing on Mac - when you close a window / software you are not quitting it. It just closes from your view, internally it is still running.
To close it properly - Use Command + Q or Application Menu's first item Quit <Application Name>
This drastically helps to save battery life. To view the applications which are still running but not seen - check the dock - you will see a small dot below the icon.
TL;DR - Use Command + Q

What is equivalent of exe file

Mac has executable file with extension `dmg`.

ALT + TAB equivalent - Command + Tab

Windows have a way to cycle between different apps and windows with Alt + Tab.
For mac -->>
Command + Tab - Swtich Apps
Command + ~ (Tilde) - Swtich between different windows in same app

Snipping Tool - How to i "Print Screen"

Windows have this useful app called snipping tool which is just amazing to take quick screen shot
Command + Shift + 3 - Print screen saves file on desktop
Command + Shift + Option + 3 - Print screen copies in clipboard
Command + Shift + 4 - Use cursor to take snippet / part of screen saves on desktop
Command + Shift + Option + 4 - Copies in clipboard
(I know what where they thinking when they had complicated 4 key way to take simple screen shot - once you use it for two three times, you find it super useful instead of search for snipping tool)

Task Manager - Ultimate weapon to kill a process

Activity Monitor is equivalent of Task Manager in windows. By this time you will know how to open it -- Command + Spacebar > Activity Monitor
Ctrl + Alt + Delete - Command + Option + Esc
Side note - listen to this podcast - Ctrl + Walt + Delete

Reasons for me to shift

- When I watched many YouTube videos from google developer's channel, all of them using MacBook for work. I realized so many people using MacBook, there must be some reason behind it.
- I was always fan of linux - I have used Kbuntu, Ubuntu, Fedora during university days. Mac OS X is based on Linux so it holds the power of linux.
- Last point comes from the previous point - I always want to use `alias` so that if i am doing some task over and over, I can just use it in single command

I am also planning to make another post which will have some advanced settings.

Special thanks to my dear friend and colleague Hasa(e)n. His github and blog.
He was my inspiration of today's post.

Disclaimer - I may have missed few important points - please leave a comment below to help the blog out.

Tuesday, September 9, 2014

Why Winamp?


Are you music lover or audiophiliac?
Do you listen to music while working?
Do you want complete silence from Sales guys' blabbering?
Are you too lazy to put headphones on and off frequently?
Are you keyboard lover?
Do you listen to audio on your computer instead of music streaming website?
Are you concerend about the memory usage on computer?
Do you want things to be done quickly?

If I want to answer in two parts it will be "Global Hotkeys" and "Winamp"
With few combination of global keys you can have control over your music playback. You need not be inside winamp to control. Best part is it consumes less memory than a tab in google chrome.

Steps
1) Download and install Winamp
2) Right click on any mp3 file -> Open With -> Set default option as Winamp (optional)
Step 2 - Make Winamp as default mp3 player
3) Open Winamp
4) Options -> Preferences / Ctrl + P
Step - 4 - Opening Preferences
5) Move to global hot keys
6) Enable
7) Select any action say "Playback : Play/Pause"
8) Click in Hotkey input box
9) Enter a global hot key which you want for the that action say "Ctrl + Shift + Space"
(Warning : Use a combination which is not used by windows or any other application, like if you use WinKey** + P as it is used for projection / secondary device connected to your PC)
10) Click on Set button (If you dont set, it wont be reflected)
11) Close Prefrences
12) Enjoy the awesomeness

Bonus) If you like this software, right click on icon in taskbar and click on "Pin to taskbar"
Bonus+) Use the classic skin :)


Keys I have used for differnt playback  

Play / Pause : Ctrl + Shift + Space (this is the most frequently used command and easy to navigate from my left hand)

Volume Up / Down : WinKey + Alt + Up / Down (winkey as it is not used for editing by most applications and alt as it is just next to it (laziness :P))

Seek Forward / Rewind : WinKey + Alt + Right / Left (if you want to skip a part of song you can quickly use this very helpful if you are listening to juke box)

Next / Previous song : WinKey + Alt + PageDown / PageUp (mostly these two keys are at the end of keyboard which you easily find without looking)

I would like to thank Inder Seth for inspiring me to write a blog post after long time :)

Happy listening!!!

**WinKey - Windows key between Ctrl and Alt

Friday, October 4, 2013

What is / How to use Flutter app


Short and perfect usage of flutter - "Flutter is Kinect for your computer"

Flutter was acquired by Google on 2nd October 2013.

Wouldn't it be nice to pause a song which you were listening to in background as soon as your colleague walks in your cubicle?
Instead of fumbling and trying to find your music player what if you can just raise your hand and pause to song?
Listening to a song which you want to change without much fuss?
Answer to all these questions is "Flutter"

This app is great if you are big fan of music.
This app is available for Windows as well as for Mac.
I will discuss Windows version, but functionality wise both are same.

So lets get started on installation and understanding how to use.

You can download the latest version of app from : http://goo.gl/8RkBVd

As soon as your download is complete and you run your file it will run through Gesture Tutorial which is very easy to understand.
App will start in your system tray.
Anytime you forget the gestures, you can view it from Flutter menu.

It uses your camera for gesture recognition.
Right now three major gestures are supported -> Play/Pause, Next(Skip forward), Previous(Move Backward)
Don't worry that it might be recording all your moves, that's not the case. So you can run around in your room (or office) without bothering much :)
There is no data sent over your net also.

Memory consumption : It is not much. Consumes around same amount of memory as your Outlook or Anti-Virus software. Sometimes it is even lower than 1 tab of Google Chrome.
Left click on system tray to toggle camera on/off and right click to open the menu.


Flutter Menu

It has support for many apps such as VLC, iTunes, Windows Media Player, YouTube(using chrome extension) and many more.


Best option I liked was - AutoSelect. App which was last in focus will be controlled using Flutter.

So let us say you were listening to song on VLC and you start YouTube, Flutter will shift its control from VLC to YouTube.
As soon as you close YouTube it moves back to VLC.
Controlling YouTube


Anytime want to present something using powerpoint and find hard time going back and forth for changing the slide, you can use flutter to control powerpoint as well :)

Download the chrome extension to use it for YouTube and other browser based supported apps.

Chrome Extension
According to me one of the reason Google might have acquired it is so that some gesture based control may be given to upcoming Nexus5.


Please leave your comments below and share it with your friends and family.

Sunday, October 28, 2012

How to downlaod videos for free? (Video Download Helper)

What is two most frequent thing we do on net??
Watch videos and download watched videos ;)
I already wrote about how to download anything in previous blog post.
Just imagine you are watching a mind blowing video at home and you want to show it your friends. Each time you will have to go to YouTube and search for that song, buffer it and then show it :(
What if I tell you that download to your local machine and then show it without buffering or searching - Video Download Helper
As usual this is Firefox addon.
Normally I use this with DownThemAll to do all my downloading.
I have been using this for more than 2 years and its really good.

Some features which grabbed me towards itself are :
1) FREE - no piracy


2) When video is not found, it is disabled. As soon as video is found, animation starts.


3) You might have different options to download video. For example by going to some link and download it. But why you need to leave your current page to download? This addon gives you option to download while you are on your page enjoying it.
You can download it either from toolbar or before its title.
As you can see in previous image. When you click on animation playing besides title, it gives various options. These options will be discussed shortly.


4) Download any video available from YouTube. It also works with MySpace, Google videos, DailyMotion, Porkolt, iFilm, DreamHost and others.


 5) Downloads in HD(1080 and 720p), 480p, 360p, 240p,medium and mobile also. These options are shown when you click animation given in toolbar.


6) Convert into .mp4,.flv,.mpeg,.m4v,.3gp and our most favourite .mp3 (mp3 - for registered user only) and many more.


Little advice, I always suggest my friends to download a video rather than watching it. If you like you will go back and download it so wasting you data usage plan and time. If you don't like it then just click Shift + Delete from your keyboard ;)

Hope you enjoy this experience.

Monday, September 17, 2012

DownThemAll - One solution for all downloads


Some of my friend asks me which browser do I use mostly. I will say for surfing net, I use chrome and downloading i use firefox.
I tell them to use DownThemAll.


Its better to use free software than to use paid software with crack and do piracy ;)
This is best downloading addon for firefox. (Better than chrome inbuilt downloading system)
There are so many features which DownThemAll provide.
I will discuss some of them.

Download 4 times faster
It splits file into numerous chuncks and downloads them simultaneously.
And you can manage number of parts in which you want to download by going to preferences.


Integrates itself with other addons
When I want to download some video from YouTube, it integrates itself with it.


Auto renaming
When you download a file, it gives option to name it in many different ways.
Most of the time it will give meaningful name which is there on web site.
I have used other downloading softwares which give name as "videoplayback1","videoplayback2"... and so on.
That is very difficult to manage.


dTa one click
This option is best thing I liked for saving my precious time :)
Whenever you have numerous options to save. Download using dTa is one click away.


You can customize it to a large extent. So make it suitable for your own use.

Have fun downloading softwares, YouTube videos, music, presentations and many more :)

If you have some more idea about downloading leave your comment below.

Monday, August 20, 2012

Download audio(mp3) of YouTube video

One of my friend sent me a YouTube link and asked to send .mp3 of that video.
I thought its easy task only two steps required.
First, download video.
Second, convert video to audio using format factory. Download here.

Wait. What if video was too long to download and to convert it will take even longer time?

I found this addon for firefox called Easy YouTube Video Downloader 6.4
(I was not able to find such awesome addon for Chrome)
Really cool addon. And yes guys its free  :)

If you search for a song on YouTube and you want it to have it on your iPod.
Don't worry this will make your life very simple.
First and best part which i liked was it was able to download mp3 file.
I have been using other downloading software also but they do not convert to mp3 file.
You need not go to other link and download it from there like some of us do.
Just click on that button which comes in YouTube page itself.
Tada!!
It will give you options to download in different formats.
(Time to give options depends on file size)

Click on mp3 format or any other format which you require.

So now we will see how it is better than previous one?
Conversion is done on server which is much faster than you converting on your own PC using any media convertors.
Now that you were not interested in downloading video file, you can download mp3 file directly.
As mp3 file size is less it takes less time to download which good for slow internet connection.

Easy and simple way to use it.

If someone has good idea about any Chrome plugin, please let us know.

Monday, August 13, 2012

Synergy & Mouse Without Borders - 2computer using 1 mouse 1 keyboard

Hey guys I am back.
Joined Adobe last month.
We were given one laptop and a desktop.
While working one thing came to my mind how about if i can use only one mouse and keyboard for both my computers.

One of my friend Joy D'Souza told me about these two software which makes it possible
Both of them have there advantages and disadvantages


SYNERGY
I am using 1.3.8 version.
[For 1.4.10 -->> see updated part]

Download latest version from here.

What is FOSS? :)
 
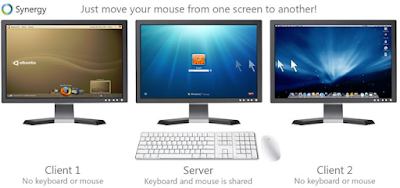
In the picture shown, you can see all three types of operating systems.
This is greatest advantage of all.
This is true meaning of platform independent ;)
I have been using this for long time so I will give you detailed description about it.

A prequiste for using these kind of softwares. You must be in same network.
There are two parts when you use Synergy.


First - Server
(hindi - jiske paas keyboard aur mouse hai)
Whenever you are server you need to configure many things.
Click on Configure button as shown.
This is the part where you need to take care.

Step - 1
Add all computer name which you are going to use.
No specific sequence required.

Step - 2
Based on screen names added by you, you have tell Synergy where are your screens placed
There are 3 drop down box.
To understand it easily we will take an example.
Two screen names are - kpfaldu-W7 and kpfaldu-W7-1
kpfaldu-W7 screen is left side of kpfaldu-W71-1
This is configuration
-> Right, kpfaldu-W7, kpfaldu-W7-1
-> Left, kpfaldu-W7-1, kpfaldu-W7

Do not forget to click '+' button after each step.
So now you have configured your server.

Second - Client
(hindi - dusre ka keyboard aur mouse use karega)


This is more simple part of whole process.
Just select first radio button.

After both of them have been configured, you can first test if you have done it correctly then you can start using buttons given.

For more updates about product and if you want to know it better, you can go to their official blog.

Disadvantage is that you cannot drag and drop files from one screen to another screen which is sometimes useful.

While writing this blog I am using Synergy :)


-------------------------------------------------------------------------------------------------------
[updated]
Recently started using iMac and installed Synergy.
I downloaded Synergy 1.4.10 (Can't use Mouse w/o Border)
They have improved it so much that I had to write about it.
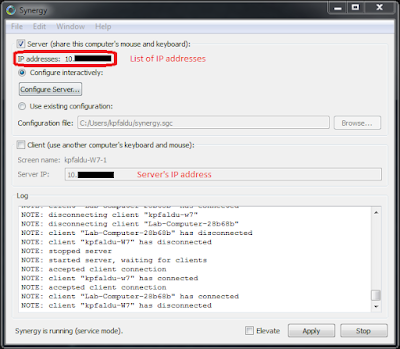
Here is screen shot for new UI.


 At the top, it shows you IP addresses for server.
So when you are configuring on client side, you can just look at address and type it in text field.


Best update is for configuration for Server.
This is its screen shot.


3 important things I want to tell you guys.

Now its easy to configure clients, just drag and drop computer seen on top right corner.
After dropping it, click on it and you can change it's screen name.

If you want to delete a screen just drag and drop it in recyle bin seen on top left corner.

Last thing, I didn't know that we can add two screen on left and right side of server.
But you can do it :)
In screen shot shown here you can see my server has two screens left of it.

Enjoy using Synergy 1.4.10 :)
-------------------------------------------------------------------------------------------------------


MOUSE WITHOUT BORDERS
It is an Microsoft Garage project developed by Truong Do.


Big advantage of using this is you can drag and drop files from one screen to another.
And disadvantage is that it cannot be used across different OS, only Windows are supported.
I have not used it at all.
So I will ask Joy to write something below in comments.

Have fun with these two sofwares :)

Monday, March 12, 2012

Net Llimiter - Internet Speed Blocker


Did you ever wonder what if you could control downloading and uploading speed for a particular application?
Yes we have Netlimiter!!!!!!!!
It may be any application such as Torrent downloader to simple Web Browser such as Chrome or Firefox (will not mention IE because it is not used at all by professionals ;))
If you are using shared Wi-Fi then this is one of the application which you should use.
Let us say that you and your friend both want to download some movie or applications and you don't want to disturb other's downloading then you can limit your downloading speed for specific application.
Netlimiter blocks the speed on software level rather then on hardware level so it is easier to manage individual applications.

It has numerous features which you can explore.
I normally use three main parts which is sufficient to control downloading and uploading speed.

Node View

This part contains all the applications which can use internet.
GUI is very easy to use. We have all the applications listed and speed which they are downloading and uploading.
Just by clicking on checkbox beside a particular application, you can limit its downloading/uploading speed.
If you want to view only online / offline applications, we can do that too. Top right corner in Node View has that links to filter applications.
In above image you can see that I have put restriction on uploading limit for utorrent.
The number you see is in Bytes. You can even change to kB/MB/GB.
It will also show total downloading and uploading speed used by your computer.
In above image you can see 59142(down) 28602(up) as computer's speed.
(Btw. ADIPADI is my friend's computer name :))

Info View

Most important is the rule list.
You can Add, Edit and Delete rules.
Basic rule is for the speed and in which unit it is mentioned.
If you want to schedule timings for blocking the speed you can do it by adding new scheduler rule.
This is used specially when you don't want to block when you are out but you want to block while you come back from work.

Chart

It is always better if you see a graphical represenation of the speeds.
You can select which speed you want to view.
Option is available in top right corner of the chart window.

If you want more information then you can click on this wiki link.

There is a youTube video about it for step by step installation.

Wednesday, February 15, 2012

Opera Mini


Using GPRS?
Is your data plan exhausted too soon?
Use Opera Mini.

It saves upto 80% of the data usage
(As they say ;)).

This is a one of the browser which is support on all major phone platorms.
Android,iOS,Blackberry,Symbian 60 and Windows as well.
I am using on my Android phone and some of my friends are using on Nokia - Symbian 60. We both are satisfied with our performance.

If you are using Android phone then you can download it from here.

Opera uses its own Opera Services to compress and load pages. This is the main reason why pages loads so fast.
Its GUI is the best one I have come across.

Some of the striking features can be found by clicking on Opera button(bottom right corner) are :


1)Tabs : You have multiple tabs same as our PC browsers have. To switch between those is very simple and fast. One of the interesting thing is if you click on a link for 2 secs, you will get option to open that link in new tab.


2)Speed dial : If you are using mozilla then you might have come across speed dial addon. This is the home page when opera starts so when you are in hurry you can quickly go to your favourite site and check updates.


3)Bookmarks, History are also available with save page option.


4)Settings : This feature makes it customized to a large extent from text wrapping to image quality you get everything.

5)Opera link : You can sync your PC opera to Opera Mini. I dont think this option is much useful to us because most of us use either Mozilla or Chrome on our PC.


6)Save image option : Let us say you are visiting some website where you dont want to download whole page but just a image. You need to click on image for 2 secs and you will get an option to download it.


7)Find text : This is option which is mainly used in pdf files to find a specific word. If the page you are visiting has lot of content and you want to go to specific word in one shot. You can use this option to find that word.


8)Data usage : We discussed earlier that it saves upto 80%. You can now verify it. This option is available in Help -> Data usage. You can reset it every month if you like. This also saves us from extra usage which we might have used without our knowledge.


Here is a small video about Opera. Thought you would like it.


Follow my blog if you like technical stuff and want to know more :)

Tuesday, January 24, 2012

VLC Direct Pro - Remote Control for PC

Ever thought a remote for your PC?
If you have an Android phone and PC installed with VLC then its possible :)


You can download "VLC Direct Pro" app from Android market :
This app is a paid app. Free version is also available but some of the features are disabled.


After you download the app, you have to connect your Android phone with a WiFi. Note that your PC for which you will use your phone as remote should also be connected to same WiFi.

When you start the app you will see a GUI which will have all the list of videos which are there on your phone.

web interface

You need to select menu, in settings you need to select "Automatic Connection Wizard"
Open VLC on your PC.
Click on "View" -> "Add Interface" -> "Web Interface"
Click on Start on your phone.


 Now the app will scan for your device.
After scan is completed, it will show that "VLC found".


ipconfig
 
If you are not able to find VLC then you can do manually.

On your PC "Start" -> "Run" -> type "cmd" -> type "ipconfig" in command prompt.
Find your wireless ip address. Here we have 192.168.1.3
In VLC Direct, go to "Menu" -> "Settings" -> Manual Configuration -> Enter above ip address in VLC Host.
Now you are connected to your PC.


Using this application you can stream videos both ways. From phone to PC and PC to phone. You can select the option on top left corner of the app. You can toggle between them by just clicking on it.


Green Droid
Green Droid logo -> stream from PC to phone.
(Buffering of video will be there)


VLC logo -> stream from phone to PC.
VLC logo


Buffering

To use this feature. First you need to select the target and then play the file.
It does not work if you are playing a file and you change target.


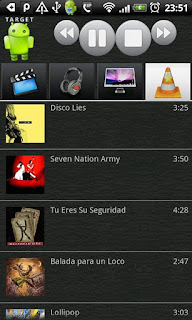
You have four options which can be selected using appropriate tab.


 <----------------------------------
First Tab (Video files on your phone)
Folder which contains some media will be combined in one and you can select which file to stream or play.


------------------------------------------------------>
Second Tab (Audio file on your phone)
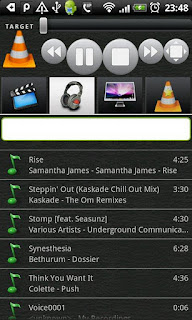
It will contain list of all audio files on your phone. You can even search for the file you want to play.


<--------------------------------
Third Tab (All files on your PC)
As you are connected to your PC you can view all the files in different drives.
You can bookmark the folder, hide non-media files and many more things.


-------------------------------------------------------->
Fourth Tab
It will show which file is being played.
(To tell you the truth I dont know much about this tab)


 It also supports subtitles.
This can be done by keeping the subtitle's file name same as video name and extending with .srt.

In menu you can select "Tips" for more options which you can use.


You can watch a video for better understanding.

Thursday, October 6, 2011

Offline Gmail


No internet connectivity or low connectivity??
Tired of writing the same mail or viewing the inbox numerous times?
Now comes the "Offline Gmail"
Its cool gmail lab designed by the gmail team.
I got most of the information about this from the gmail blog.
It has been around for a long time but i did not use it for a long time.
Now i use it most of the times, the GUI is like viewing from a mobile device.
When you are online, the google server stores all the inbox to your computer.
So when you are offline, it will fetch the mail which is stored on your computer itself.
Now you will ask what if I want to send a mail?
Its very interesting how google does that,
it will store your mail in outbox.
Constantly the gmail is looking for internet connection.
When it gets one, all the outbox mails are sent and new inbox mail are sent in.
Its just awesome to have this facility because now you need not learn how to use applications like Outlook Express ;)
This is how you can install the offline gmail
1)Click the gear icon in the upper-right -->> select Mail settings.
2)Select the 'Offline' tab -->> select the 'Enable Offline Mail for this computer' radio button. Click save changes.
If you have some downloading problem then you can see this help.

If you are using google chrome then you have nice extension for it.

Here is a nice video about offline gmail that you can look into
Enjoy offline mailing :)

URL Shortener


Is you link too long to remember or write it down while you are on a call?
Many times we want to share some link with our friends and everyone,
but its too long so we just send it via mail or any other alternative.
You get sick and tired of sending to everyone or telling everyone.
What you can do is that change the long url to a short one.
I have came across two websites which does that.
First one is Google url shortener and other is tiny url.

Google url shortener

Its very easy to learn and use it.
Just type in your url and press button shorten.
You can convert a url by logging in to your account also.
It will store all urls in your account.
The only problem is that you cannot give a your customized url.
Google will provide you with a small url which is again difficult to remember.


Tiny URL
It will give you all the option as above.
And a new option to customize your url also.
This is the best thing i liked about it.
Now you can remember this new url also.
One more thing is that you can add this into your toolbar.

Enjoy shortening ;)